
7 Essential Excel Data Validation Examples to Master in 2025
Why Mastering Data Validation is Non-Negotiable for Data Pros
In the world of spreadsheets, data integrity is king. Every incorrect entry, typo, or out-of-bounds value can cascade into flawed analysis and poor decision-making. This is where Excel's Data Validation feature transforms from a simple tool into a critical gatekeeper, ensuring the data you collect is clean, consistent, and correct from the moment it's entered. For data analysts, accountants, and anyone who lives in spreadsheets, mastering these techniques isn't just about efficiency; it's about building a foundation of trust in your data.
This article moves beyond the basics to provide a deep dive into powerful excel data validation examples. We will dissect each technique, offering strategic analysis, step-by-step implementation guides, and replicable methods to elevate your data management skills. Forget surface-level descriptions; we are focusing on the why and how behind each validation rule, providing actionable takeaways you can implement immediately.
You will learn to enforce specific criteria for everything from project dates to product codes. Our goal is to equip you with a robust toolkit for controlling user input and preventing errors before they happen. We will explore a curated collection of scenarios, including:
- Dynamic drop-down lists that prevent spelling mistakes.
- Custom formulas that enforce complex business logic.
- Cascading drop-downs for dependent choices.
- Strict rules for dates, numbers, and text length.
Prepare to lock down your worksheets and eliminate data entry errors for good. A clean dataset is the ultimate professional asset, a testament to precision and reliability. For those looking to showcase their spreadsheet mastery, remember that a perfectly validated worksheet has the same satisfying appeal as finding unique Excel gear to celebrate your data-driven role. Let's dive into the examples that will make your spreadsheets foolproof.
1. Drop-down List Data Validation
The drop-down list is arguably the most fundamental and widely used of all Excel data validation examples. It transforms a standard cell into a controlled selection menu, forcing users to choose from a predefined set of options. This simple yet powerful constraint is the first line of defense against data entry errors, eliminating typos, inconsistent phrasing, and invalid entries that can corrupt datasets and derail analysis.

At its core, this validation rule restricts input to a specific list of values. Instead of freely typing, a user clicks the cell and a small arrow appears, revealing the allowed choices. This is crucial for maintaining data integrity in fields where consistency is non-negotiable, such as status tracking, category assignment, or regional identifiers.
Strategic Analysis and Implementation
The true power of drop-down lists comes from their implementation strategy. While you can manually type a comma-separated list directly into the data validation source field, this method is static and difficult to update. A far more robust approach involves using a cell range as the source.
For ultimate flexibility, this source range should be converted into a Named Range (Formulas > Name Manager > New). For example, create a list of department names (e.g., "Sales," "Marketing," "HR") in a separate sheet, select them, and name the range DeptList. When setting up data validation, you simply enter =DeptList in the "Source" field. This decouples the list from the validation rule itself. Now, if you need to add, remove, or edit a department, you only update the source list, and every drop-down menu linked to that named range updates automatically.
Actionable Takeaways and Best Practices
To elevate your use of this feature, consider these tactical insights:
- Organize for Usability: Always keep your source lists alphabetically sorted. This makes it significantly faster for users to navigate and find the option they need, especially in long lists.
-
Create Dynamic Lists: For source lists that change in length, use a dynamic named range with a formula like
=OFFSET(Sheet2!$A$2,0,0,COUNTA(Sheet2!$A:$A)-1,1). This formula automatically expands or contracts the named range as you add or remove items from the source column, ensuring your drop-downs are always up-to-date without manual adjustments. - Enhance with User Guidance: Use the "Input Message" tab in the Data Validation dialog box. You can add a title like "Select a Status" and a message such as "Please choose from the available options." This small prompt guides users and clarifies the cell's purpose, reducing confusion and improving the user experience.
2. Date Range Validation
Restricting date entries is a cornerstone of maintaining temporal data integrity. Date Range Validation in Excel allows you to enforce logical boundaries on date inputs, ensuring that all entries fall within a specified period. This is one of the most critical excel data validation examples for preventing nonsensical data, such as future hire dates or project deadlines that precede their start dates, which can invalidate timelines and financial forecasts.

This rule works by setting a "between" condition on a cell, defining a valid start and end date. Any attempt to enter a date outside this window is immediately blocked. It is an indispensable tool for project management (scheduling tasks within a project phase), financial reporting (booking entries within a fiscal quarter), and HR administration (processing timesheets for a specific pay period).
Strategic Analysis and Implementation
While you can hard-code static dates like "1/1/2024" and "12/31/2024" directly into the validation rule, the real power lies in dynamic, formula-based boundaries. This approach allows the valid date range to update automatically based on other factors in your workbook, creating a self-regulating system that requires no manual intervention.
A powerful strategy is to use cell references for the start and end dates. For instance, if cell B1 contains a project's start date, you can set a validation rule on the task due date column to be greater than B1. For a more advanced implementation, combine this with functions. To ensure a date is in the current year, set the validation to be between =DATE(YEAR(TODAY()),1,1) and =DATE(YEAR(TODAY()),12,31). This formula dynamically calculates the first and last day of the current year, making your validation rule perpetually relevant without annual updates. For more complex data handling scenarios like these, you can explore advanced techniques; for instance, you can master data transformation with Power Query to clean and prepare your date fields before they even reach the spreadsheet.
Actionable Takeaways and Best Practices
To maximize the effectiveness of date validation, apply these tactical methods:
-
Use TODAY() for Dynamic Deadlines: To prevent users from entering past dates for future-facing tasks (like appointments or follow-ups), set the validation rule to "Date > Greater than" and use the formula
=TODAY()as the start date. This ensures all new entries are for today or a future date. - Provide Clear, Corrective Error Alerts: On the "Error Alert" tab, change the Style to "Stop" and craft a precise message. Instead of the generic "The value you entered is not valid," write something like, "Invalid Date. Please enter a date between [Start Date] and [End Date] for this project phase." This immediately informs the user of the exact requirement.
-
Account for Regional Date Settings: A common pitfall is that
MM/DD/YYYYin the US isDD/MM/YYYYin Europe. While Excel often handles this, it's best practice to use theDATE(year, month, day)function in your validation formulas. This function is unambiguous and works correctly regardless of the user's regional settings, preventing validation errors caused by date format confusion.
3. Number Range Validation
Beyond simple text choices, enforcing numerical integrity is a critical function of data validation. Number range validation constrains user input to a specific numeric boundary, ensuring that values fall between a defined minimum and maximum. This rule is indispensable for maintaining logical, mathematical, and business-rule compliance, preventing erroneous entries that could skew calculations, violate policies, or corrupt financial models.
At its core, this validation rule prevents users from entering numbers that are either too low or too high. It is the gatekeeper for any field representing quantities, percentages, scores, or financial figures. For instance, it can ensure an age field accepts values only between 0 and 120, a percentage completion field only accepts numbers from 0 to 100, or an inventory reorder quantity remains above a minimum stock level. This makes it a cornerstone of many robust Excel data validation examples used in business.
Strategic Analysis and Implementation
The real power of number range validation lies in its dynamic application. While you can hard-code static minimum and maximum values directly into the data validation dialog box (e.g., Minimum: 0, Maximum: 100), this approach lacks flexibility. A more sophisticated strategy is to reference other cells for these boundaries.
For maximum control, dedicate specific cells on a configuration sheet to hold your key business rule values. For example, create cells named MinDiscount and MaxDiscount. When setting up data validation on a "Discount %" column, you would choose "Decimal" from the "Allow" dropdown, select "between" for the "Data" criteria, and then enter =MinDiscount in the "Minimum" field and =MaxDiscount in the "Maximum" field. This decouples the rule from the individual cells. If your company’s discount policy changes, you only need to update the values in the MinDiscount and MaxDiscount cells once, and all dependent cells will automatically enforce the new rule. This is particularly useful for managing data that must adhere to thresholds which may need to be filtered or analyzed later; you can learn more about using advanced filters for data analysis on sumproductaddict.com to handle such datasets effectively.
Actionable Takeaways and Best Practices
To maximize the impact of this feature, apply these strategic insights:
- Specify Number Type: Be deliberate when choosing between "Whole number" and "Decimal" in the settings. Use "Whole number" for items that cannot be fractional, like the number of employees or units sold. Use "Decimal" for financial figures, measurements, or percentages to avoid unnecessary entry errors.
- Provide Clear Error Alerts: Customize the "Error Alert" tab to provide meaningful feedback. Instead of the generic Excel error, create a "Stop" alert with a title like "Invalid Quantity" and an error message such as, "Please enter a value between 50 and 500. Check the current stock policy for details." This immediately educates the user on how to correct their mistake.
- Document Your Logic: When using cell references for your minimum and maximum values, use the adjacent cells to document the business logic behind those numbers (e.g., "Minimum Order Quantity set by Q3 supply chain policy"). This institutional knowledge is invaluable for future audits or when other users need to understand the worksheet's constraints.
4. Text Length Validation
While drop-down lists control what is entered, Text Length Validation governs how much is entered. This type of data validation rule controls the character count of text or numerical entries, ensuring every input adheres to a specific length. It is a critical tool for maintaining data formatting consistency, especially when preparing data for export to external databases, APIs, or legacy systems that have strict field length requirements.
This validation prevents common errors that can cause system integration failures, such as truncated product codes or incomplete ID numbers. By setting a minimum, maximum, or exact character limit, you create a structural guardrail that enforces uniformity. This is indispensable for fields like product SKUs, employee IDs, ZIP codes, or any identifier where length is a defining attribute of the data's validity.
Strategic Analysis and Implementation
To implement this rule, you navigate to Data > Data Validation and select "Text length" from the "Allow" dropdown. The true strategic value comes from choosing the right operator from the "Data" dropdown. You can set it to "equal to" for fixed-length fields like a 9-digit Social Security Number, "between" for a range like a password policy, or "less than or equal to" for comment fields with a character cap.
For example, a common requirement is a 5-digit US ZIP code. Setting the validation to "equal to" with a "Length" of 5 prevents users from entering a 4-digit code or a longer ZIP+4 format. For a product code that must be between 8 and 10 characters, you would select "between," setting the "Minimum" to 8 and the "Maximum" to 10. This precision is vital for data that will be processed by other systems, as it preemptively eliminates a common point of failure in data migration and integration projects.
Actionable Takeaways and Best Practices
To maximize the effectiveness of text length validation, consider these tactical approaches:
- Provide Clear Feedback: Use the "Error Alert" tab to create a custom message. Instead of Excel’s generic error, a custom alert like, "Invalid Entry: Product Code must be exactly 8 characters long," immediately informs the user of the specific rule, speeding up correction.
- Document System Requirements: Before setting length limits, always research the requirements of the target system (e.g., an ERP or CRM). Base your validation rules on the destination database's schema to prevent export errors. This proactive step is a cornerstone of effective data scrubbing techniques. For more insight, you can explore detailed strategies for preparing data for analysis. Get started by learning about seven data scrubbing techniques to master pristine data on sumproductaddict.com.
-
Combine with Other Rules: For even greater control, use a Custom Formula to combine length validation with other criteria. For instance, the formula
=AND(LEN(A1)=5, ISNUMBER(A1))would not only enforce a 5-character length but also ensure the entry is numeric, perfect for a standard ZIP code field.
5. Custom Formula Validation
When standard data validation options fall short, custom formulas provide a gateway to virtually limitless control over data entry. This advanced technique allows you to define your own logical tests, creating sophisticated rules that precisely match complex business requirements. It moves beyond simple lists or number ranges, enabling validation based on other cells, intricate calculations, or specific data patterns.
At its heart, this method uses an Excel formula that must evaluate to either TRUE (for valid data) or FALSE (for invalid data). If the formula returns TRUE, the entry is accepted; if it returns FALSE, the entry is rejected. This is the cornerstone of powerful excel data validation examples, enabling checks like ensuring an end date is later than a start date, preventing duplicate entries in a column, or validating a complex product code structure.
Strategic Analysis and Implementation
The strategic power of custom formulas lies in their ability to enforce relational integrity and business logic directly within the worksheet. For instance, to ensure an "End Date" in cell B2 is always after the "Start Date" in cell A2, you would select B2, go to Data Validation, choose "Custom," and enter the formula =B2>A2. This simple formula creates a dynamic link between the two cells, preventing logical impossibilities.
For more advanced scenarios, such as preventing duplicate entries in a range like C2:C100, the formula becomes more sophisticated. By selecting the entire range and applying the custom formula =COUNTIF($C$2:$C$100, C2)=1, you create a rule that checks if the current cell's value appears only once within the specified range. The use of absolute and relative references here is critical: $C$2:$C$100 locks the entire range for comparison, while C2 adjusts for each cell being evaluated. This prevents data duplication in real-time, a crucial step for maintaining clean unique identifier columns. If you're looking for a more in-depth tutorial, you can explore this easy step-by-step guide to data validation in Excel.
Actionable Takeaways and Best Practices
To effectively implement custom formula validation, consider these tactical approaches:
- Test Formulas Separately: Before entering a formula into the Data Validation dialog box, test it in a spare cell on your worksheet. Enter the formula and confirm it returns TRUE or FALSE as expected for various test cases. This makes troubleshooting far easier than debugging within the validation settings.
-
Use Helper Columns for Complex Logic: For extremely complex rules involving multiple
IF,AND, orORfunctions, the formula can become unwieldy. Consider using a hidden helper column to perform the main calculation. Your data validation formula can then simply reference the helper cell, for example,=H2=TRUE, keeping the validation rule clean and easy to manage. - Document Your Logic: Custom formulas are not self-explanatory. Use the "Input Message" tab to briefly explain the rule (e.g., "ID must be unique"). For very complex formulas, add a comment to the cell or a note in a separate documentation sheet explaining what the formula does and why it's necessary for future users (and your future self).
6. Cascading/Dependent Drop-down Validation
Moving beyond single, independent menus, cascading or dependent drop-down validation creates a dynamic and interactive data entry system. This sophisticated technique establishes a logical hierarchy between cells, where the selection made in a primary drop-down list directly filters and determines the options available in a secondary drop-down list. This is one of the most powerful excel data validation examples for guiding users through complex, layered data structures.
This method is essential for enforcing relational integrity directly on the spreadsheet. For instance, selecting a "Country" in one cell could automatically populate the adjacent cell's drop-down with only the "States" or "Provinces" corresponding to that country. This prevents illogical combinations, such as selecting "USA" as the country and "Ontario" as the state, drastically improving data accuracy and usability in guided forms and templates.
The following infographic illustrates the core three-step process flow that powers this functionality, showing how a user's initial choice triggers a lookup that populates the next set of valid options.
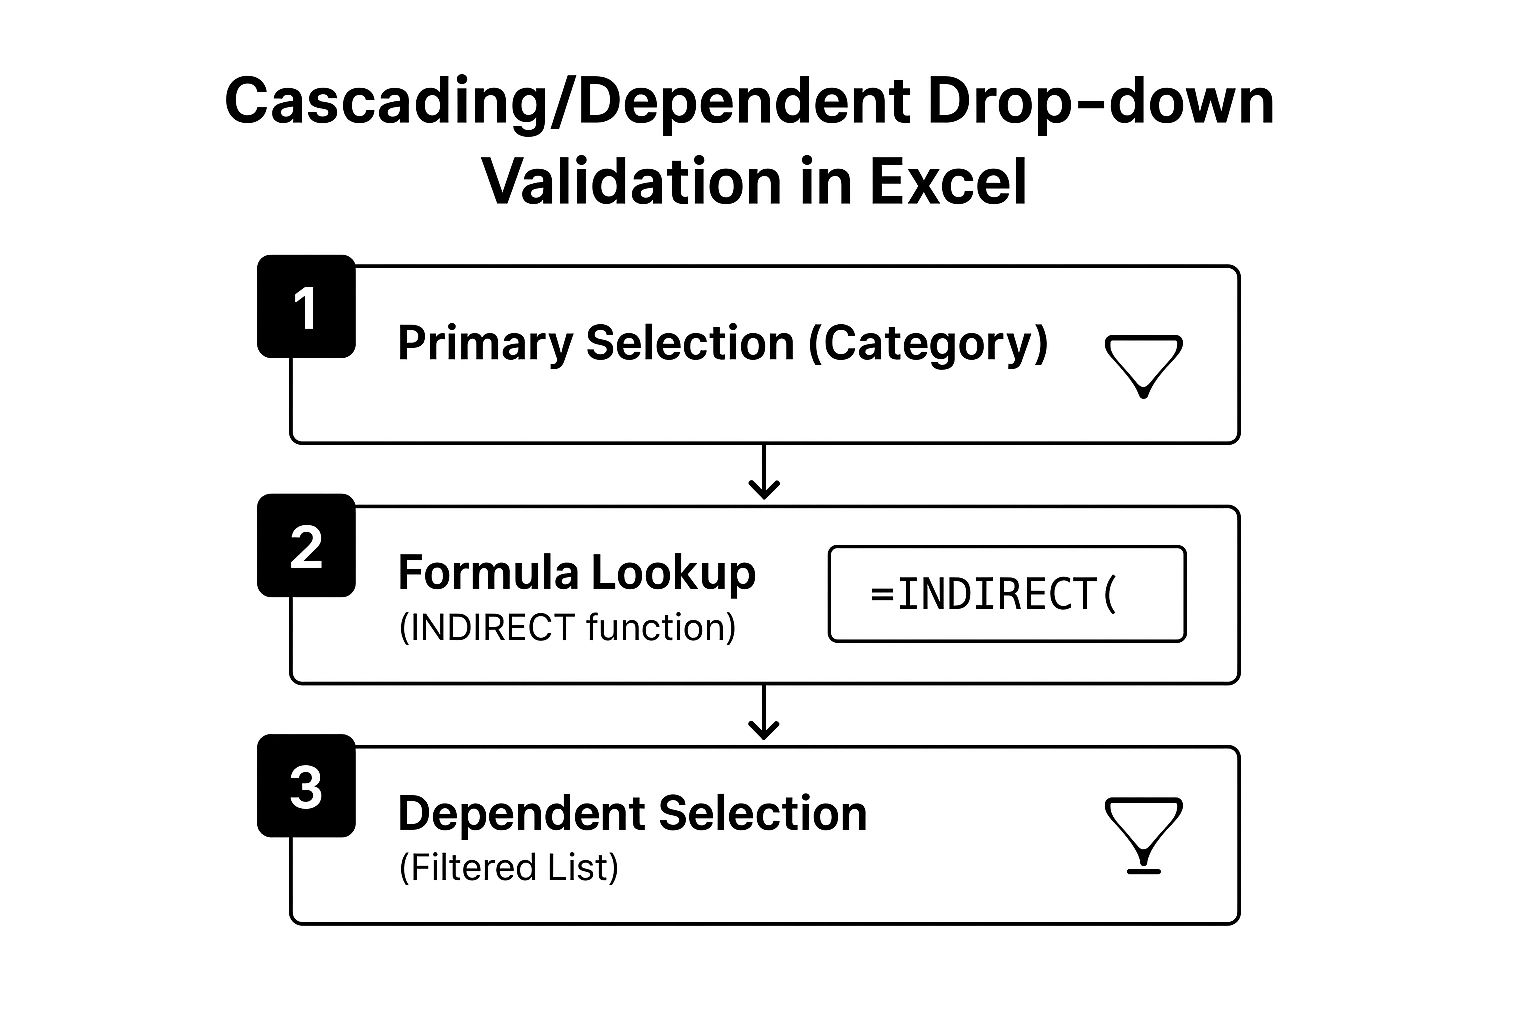
This visual process flow highlights the critical role of the INDIRECT function, which acts as the bridge between the user's first selection and the generation of the second, filtered list.
Strategic Analysis and Implementation
The implementation of cascading drop-downs requires careful data architecture. The core strategy revolves around creating multiple Named Ranges, where the name of each secondary list exactly matches an item from the primary list. For example, if your primary list contains "Fruit" and "Vegetable," you must create two separate named ranges called Fruit (containing "Apple," "Banana") and Vegetable (containing "Carrot," "Broccoli").
The magic happens with the INDIRECT function. For the secondary drop-down's data validation source, you use a formula like =INDIRECT(A1), where A1 is the cell containing the primary drop-down. When a user selects "Fruit" in A1, Excel interprets the formula as =INDIRECT("Fruit"), which resolves to the named range Fruit, thus populating the second drop-down with the correct items. This approach is highly scalable for complex hierarchies, like filtering products within categories or employees within departments.
Actionable Takeaways and Best Practices
To effectively deploy this advanced validation, focus on structure and user experience:
-
Plan Your Data Structure: Before creating any lists, map out your data hierarchy. Carefully structure your source lists on a separate sheet, with the primary list items serving as headers for their corresponding dependent lists. This organized foundation is crucial for the
INDIRECTfunction to work correctly. -
Handle Spaces in Names: Named ranges cannot contain spaces. If your primary list items have spaces (e.g., "North America"), you must use a workaround. A common method is to use a helper column with a
SUBSTITUTEformula (e.g.,=SUBSTITUTE(A2," ","_")) to create valid range names ("North_America") and then use this helper column to name your ranges. -
Implement an Error Clear-Out: A common issue is that after changing the primary selection, the old secondary selection remains, creating an invalid data pair. Use a small VBA macro tied to the worksheet's
Changeevent to automatically clear the dependent cell's content whenever the primary cell is updated, forcing the user to make a new, valid selection.
7. Whole Number Validation
While seemingly basic, whole number validation is a critical tool in the Excel data validation examples toolkit. It acts as a gatekeeper, ensuring that cells designated for counts, IDs, or other integer-based data accept only whole numbers. This prevents the accidental entry of decimals or fractions in fields where they are logically impossible, such as the quantity of physical items or the number of event attendees.
This validation rule is essential for maintaining mathematical and logical integrity within a dataset. By rejecting entries like "4.5" for an employee ID or "100.75" for a product count, it safeguards the accuracy of subsequent calculations, reports, and analyses. It is a fundamental building block for creating reliable inventory management systems, administrative databases, and survey forms.
Strategic Analysis and Implementation
Setting up whole number validation is straightforward, but its strategic value lies in defining precise boundaries. In the Data Validation dialog box (Data > Data Validation), under the "Settings" tab, you select "Whole number" from the "Allow" drop-down. The real power comes from the "Data" field, which lets you set logical conditions like "greater than," "less than or equal to," or "between."
For instance, when tracking inventory for a product, you would set the validation to allow a whole number "greater than or equal to" 0. This prevents both decimal entries and negative quantities, which are physically impossible. For a field requiring a 5-digit employee ID, you could set the validation to accept whole numbers "between" 10000 and 99999. This not only forces an integer but also validates the number's length and range, adding a powerful secondary layer of control without complex formulas. Mastering such numeric constraints is a key skill, and you can dive deeper with a comprehensive Excel formula cheat sheet to master essential formulas on sumproductaddict.com.
Actionable Takeaways and Best Practices
To deploy whole number validation effectively, focus on clarity and context:
- Specify the Permitted Range: Don't just restrict to whole numbers; define the valid range. Use the "Input Message" to explicitly state the rules, such as "Enter a whole number between 1 and 100." This pre-empts user frustration and reduces data entry errors.
- Decide on Zero and Negatives: Carefully consider whether zero or negative numbers are valid for your specific use case. For quantity counts, zero is often valid, but negative numbers are not. For a field tracking temperature in Celsius, negative whole numbers are perfectly acceptable. Define these rules explicitly.
- Customize the Error Alert: The default error message can be generic. Use the "Error Alert" tab to create a custom, helpful message. Instead of "The value you entered is not valid," write something specific like, "Invalid Entry: Please enter a whole number only. Employee IDs cannot contain decimals." This provides immediate, actionable feedback to the user.
Excel Data Validation Methods Comparison
| Validation Type | Implementation Complexity 🔄 | Resource Requirements ⚡ | Expected Outcomes 📊 | Ideal Use Cases 💡 | Key Advantages ⭐ |
|---|---|---|---|---|---|
| Drop-down List Data Validation | Low | Low | High data consistency and error reduction | Selection from predefined options, large datasets | Easy to implement, reduces typos, guided input |
| Date Range Validation | Low to Medium | Low | Ensures valid temporal data | Scheduling, project timelines, historical data entry | Maintains date logic, supports business rules |
| Number Range Validation | Low to Medium | Low | Prevents invalid numeric entries | Financial modeling, inventory limits, budget controls | Enforces numeric boundaries, supports various types |
| Text Length Validation | Low | Low | Consistent text entry length | Product codes, IDs, export-compatible fields | Ensures field compatibility, prevents truncation |
| Custom Formula Validation | High | Medium to High | Complex, highly specific validation | Multi-field logic, advanced data rules | Highly customizable, supports complex rules |
| Cascading/Dependent Drop-down | High | Medium to High | Maintains hierarchical data relationships | Hierarchical selections like country→state→city | Improves UX with relevant filtered options |
| Whole Number Validation | Low | Low | Ensures integer-only inputs | IDs, counts, non-fractional numeric inputs | Simple, prevents decimal errors, clear user rules |
From Validation Rules to Actionable Insights: Your Next Steps
We have journeyed through a comprehensive collection of Excel data validation examples, moving from fundamental techniques like drop-down lists and number constraints to the more sophisticated world of custom formulas and cascading dependencies. The purpose of this exploration was not merely to present a list of functions; it was to fundamentally shift your perspective on spreadsheet design. The true power unlocked by these methods is the transition from a reactive to a proactive mindset regarding data quality.
By embedding these validation rules directly into your spreadsheets and templates, you are erecting a powerful defense against inaccurate data. This is a strategic move that preemptively stops errors at the source, the point of entry. It eliminates the soul-crushing, time-consuming task of manually cleaning messy datasets, a process that is not only tedious but also fraught with the risk of introducing new mistakes. When your data is clean from the start, your analysis, reports, and dashboards are built upon a foundation of trust and reliability.
Recapping the Core Strategies
Each example we covered serves a distinct strategic purpose in your data management toolkit. Let's distill the core insights from the techniques we’ve explored:
- Standardizing Inputs: Drop-down lists (both simple and cascading) are your primary tool for standardization. They eliminate typos and variations in categorical data (e.g., "NY" vs. "New York"), ensuring consistency for pivots, lookups, and analysis.
- Enforcing Business Logic: Date, number, and text length validations are about enforcing operational rules. They ensure that project start dates are logical, that discounts fall within approved percentages, and that IDs conform to required formats. This is where your spreadsheet becomes an active participant in maintaining business integrity.
-
Unlocking Dynamic Control: Custom formulas represent the pinnacle of data validation flexibility. This is where you move beyond simple constraints and start building complex, interconnected logic. Using formulas with functions like
COUNTIFfor unique entries orINDIRECTfor dynamic ranges transforms your spreadsheet from a static grid into a smart, responsive application.
Your Actionable Roadmap to Mastery
Understanding these Excel data validation examples is the first step; applying them strategically is what will set you apart. Here is a practical roadmap to integrate these powerful techniques into your daily work and elevate your Excel proficiency.
- Identify Your Biggest Pain Points: Start by auditing your own work. Where do data entry errors most frequently occur? Is it inconsistent department names, incorrect date formats, or project codes that don't exist? Target your first validation rule at your most common problem.
- Begin with the Basics: If you're new to this, implement a simple drop-down list or a whole number validation rule. The immediate benefit of preventing just one type of error will demonstrate the value and build your confidence.
- Combine and Conquer: Once you are comfortable with individual rules, begin combining them. For instance, create a dependent drop-down list and then add a custom formula validation to the next cell that cross-references the selected values. This layering of rules creates a highly robust data entry system.
- Refine Your Error Messages: Don't neglect the "Error Alert" tab. A generic "This value doesn't match" message is unhelpful. Customize your error alerts to be instructive, telling the user exactly what is wrong and how to fix it (e.g., "Please select a date within the current fiscal quarter.").
The journey from a novice to an expert in Excel is marked by the ability to build spreadsheets that are not just functional but foolproof. Mastering data validation is a non-negotiable step on that path. It demonstrates a commitment to accuracy, an understanding of process, and a respect for the time of those who will use and interpret your data. By adopting these methods, you are not just controlling data; you are engineering certainty and building a reputation for impeccable work.
For the data professionals who live and breathe this level of detail, your passion for precision is what makes you invaluable. When you're ready to wear that expertise with pride, explore the collection of clever, high-quality gear at SumproductAddict. It’s the perfect way to celebrate the craft of building better spreadsheets.